I love to have an extension after each project not only because it occupies the early finishers but because it is using what we are working on in another way. The more connections the better!
Per usual, I got my inspiration from a Pin on pinterest of a turtle with the shell as the color wheel, it linked to this awesome stuff.
Great thing about this? It worked as a sub project/lesson for my little ones the class after we did our color mixing birds and talked about the color wheel :)
As an extension: With a 1 minute intro for what to do, when my 2nd graders finished their umbrellas, they grabbed the blank color wheel printed on card stock and created some awesome color wheel creations....
As a sub lesson: I have a pretty good color DVD that I'm sure most Art Teachers have...
It was a planned absence so I re-watched the movie myself and found to what chapter was appropriate for K-1.
I had the sub show them those chapters and review with them what they learned previously and just re-learned in the movie before showing them my example. My sub was a retired art teacher so I trusted she did a good job, you could have something outlined for the sub of what things to review with them if you are hesitant to let them do it on their own.
Some other ideas for this: I thought about the possibility of next year having this as an activity for a pre and post assessment? Should something as simple as this have an objective/ I CAN for students?
Thoughts?
I asked the sub to hold on to them and I had the kiddos that did it as an extension leave them behind because I wanted to take pictures. I could of taken a picture of everyone, some were so hilarious...
While I had 4 classes for one last project with some of my 3rd and 4th graders I only had 2 or 3 with others. So, I changed up the final product of my 3rd & 4th Grade Color Mixing Gum Ball Machines to ice cream for a little faster project. A big pro of this instead of the gum ball machines was that they mixed with a little more intention and I was able to "require" an amount of secondary/tints/shades/intermediate which I didn't with gum ball machines because of the volume of painting.
I CAN statement for this project: I CAN use my knowledge of the color wheel and color concepts to create unique ice cream "flavors" with paint.
Day 1: Intro! Literally the exact same as the gum ball machines except their name went on a long piece of sulfite paper instead of tag board.
Day 2: Quick review and then the painting was underway. I still did not tell them what they were making but explained that the painted circles should be roughly the same size and talked about how many secondary/tints/shades/intermediates I wanted them to try.
Day 3: For most of these classes it was the last day of art. I revealed what they were turning the painted circles into and gave them the tan paper and brown sharpies. They didn't need to use all of the circles they painted and could cut them smaller/bigger/into swirls if they wanted. We had PLENTY of time to play our last day of art games when they finished. I would of loved to have them do some writing and show them Wayne Thiebaud but that pesky time and end of the year craziness got the best of us!
Really enjoyed the extra detail some of them added!
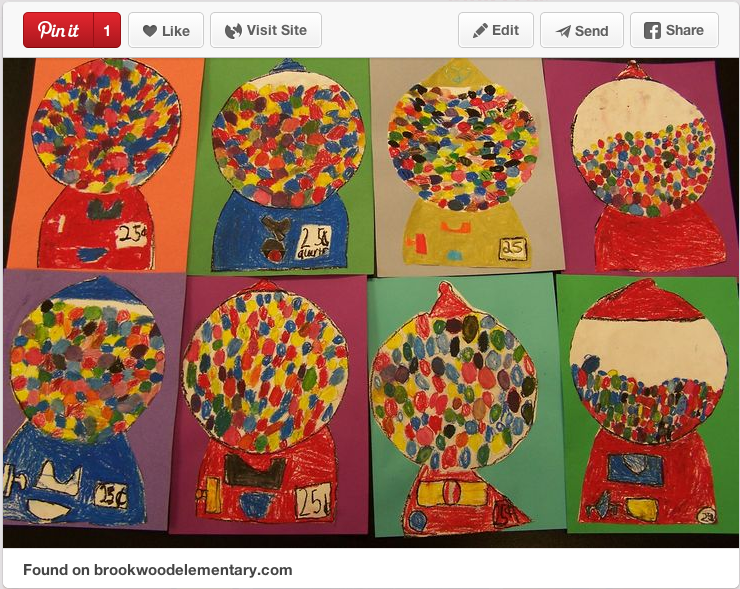
When searching for a color mixing project to do with my older students I stumbled upon this pin, unfortunately the link is bad, UGH! COME ON PINNERS! The Pin links to an art page for Brookwood Elementary school, but doesn't go much past there...
So here is a screen shot of the pin...from what I can tell the original was with 2nd graders and oil pastels. I decided to add tints and shades to the lesson and use paint and construction paper.
Once again, another awesome color project that I didn't have enough time for at the end of the year. It wasn't totally executed how it should of been and felt really rushed... I wish I had more time on this so I could of kept them from mixing without intention and had a requirement of so many secondary/tints/shades/intermediates etc. Regardless, It was still worth it every time they shot out of their seats and called me over to show me the new colors they had made :)
I CAN statement for this project:
I CAN use my knowledge of the color wheel and color concepts to create a unique gum ball machine.
Day 1: Intro! Obviously I started with the amazing YouTube color video again...it really never got old.
Then we used the same amazing TpT Color Mixing PDF that I used with 2nd grade . After we had our discussions and I became a human color wheel we filled in the color wheel just like second grade did but I added some of this TpT download, Color Buddies! The color buddies added tints and shades and intermediates which I was hoping they would encounter in this mixing extravaganza! After I checked off their sheets I wrote their name on a 1/2 sheet of tag board on the matte side and put it in a pile to start with next time. If they didn't have one at the start of the next class I knew I had to still check their worksheets.
Day 2 (3): Started off with a super quick review. Watched the video again and shot off questions about tints, shades, and intermediates. Then I revealed what we were making and how we were going to spend two whole classes painting like maniacs. The goal was to paint the gum balls as close together as possible and when sections dried overlapping the dots with more dots. My emphasis was quality not quantity so they were not restricted to size. They had two days to paint and needed to paint the entire time. The final size of the machines had no specifics so some only filled a small part of the page while others filled it full.
My classes with less time at the end of the year only painted for 1 class period, which meant smaller machines but was still just as exciting, and effective.
Last Day: We started the class browsing images of different gum ball machines and looked at all the different possibilities, I wanted them to know it was pretty much limitless so I felt this discussion was really important. The most challenging part was explaining how to find/create the sphere of gum balls in their midst of dots. Some students had really small areas with paint while others filled the page. I set out a variety of circles objects that could be traced for the sphere and showed them how I found mine. I looked for the sections with my most vibrant colors that filled the sphere well and made it appear like it was not full. The key was to not have floating gum balls. Some students used colored sharpies to add a few more gum balls so they could use the section they really wanted.
So before they cut their pages looked something like this....
The "wasted" dots not inside the circle were used to create extra details in their machines...like falling gum balls or the one they just received from their machine!
It was pretty open as to the rest of the creating... it had to have a base and place for the gum ball to come out and those were the only requirements.
Some students went more traditional...
Others went a little more creative...
This project will for sure be a repeater in the future!
School starts in a week and I'm still blogging about projects from last year! My goal this year is to get them up quicker and not back blog!
This project was one that ended up being different from class to class because we were getting down to the final days of art, some have splatter painted rain while others used torn paper. It just came down to time. If and when I do this project again I will leave it up to them. I'm going to go ahead and predict with confidence that splatter painting will be the favored choice!
From what I remember this project is my own but I'm sure I was influenced by all the awesome umbrella/rain projects on Pinterest....FOUND THE PIN!
I CAN statement for this project: I CAN show my knowledge of the color wheel and mixing primary colors to make secondary colors to paint an umbrella.
Day 1: Intro! Started with my awesome YouTube find I mentioned in the color project post.
We used this as the jumping off point for talking about the color wheel and what goes where and why. I found some awesome stuff on Teachers Pay Teachers to use as tools in this discussion, by far...this one was the best! Great graphics and worksheets! After we chatted I had them fill out a color wheel (provided by my TpT download)...Doesn't it look great, and simple!?
Once their color wheel was approved by me, after they checked with a buddy too, I gave them one of these sheets to work on...
The same TpT packet had these too! And multiple versions! And pages to cut the answers from! SERIOUSLY. AWESOME. Just about everyone finished these activities and spent time finishing other work when done. I worked with kiddos in small groups that weren't quite getting it so they would be ready for part 2 next art class.
Day 2: Review! Started with the video again, pausing when I could for them to answer what was going to happen or what things were called. Then I revealed our project and demonstrated setting up the umbrella and mixing. I had tracers for the umbrella shape and they had to draw in the sections of the umbrella. We talked about how our goal was to get the primaries down first to keep our paint and brushes "clean" then make the secondaries. The "It's rainbow order!" lightbulb clicked pretty fast once painting started.
For those that had an extra class, splatter painting was next! There was quite a bit of time so while they worked on the umbrellas I called groups of 3 or 4 over to splatter. We used a magazine to block out the space for the umbrella where it was keeping us dry!
If they did not have an extra class they got to work collaging a person under the umbrella and tearing paper to make raindrops and other extras. If they got really behind they just did a handle. On their last day of art they quickly drew the sections back in with sharpie and glued the umbrella on with glue stick so they could take it home.
Day 3: For the kiddos that had another day we started collaging and gluing everything together to the splatter painting and it was done before the last day of art so we could enjoy art games together and did not have to scramble to finish things!