Pages

Showing posts with label Adaptive Art. Show all posts

Saturday, April 9, 2016

Adaptive Art Winter Art!

Well we got snow yesterday in Wisconsin, so precipitation speaking it is still winter. If it makes you feel better we actually made these throughout December and January....

 My high school adaptive art students vary quite a bit in ability and all ended up being successful with these projects...

Trees: This project I did with my Kinders and 1st graders and you can read about it here.

Mittens: Using a tracer they drew the mittens and then cut tissue paper and collaged it on with watered down glue. The backgrounds were painted paper with a finishing touch of white sponge painting.
They LOVED making these snowmen. We made the balls with newspaper and masking tape then attached popsicle sticks on the bottoms so they wouldn't topple over. For paper mache we used newspaper strips and only the best supply ever for paper mache...Elmer's Paper Mache Art Paste!
Elmer's Non-Toxic Washable Art Paste, 2 oz
I only see these students for about 40 mins 3 times a week so we took 2 classes for paper mache, one for painting, and part of one for making them into real snowmen with buttons and other embellishments.

Monday, April 4, 2016

Winter Forests with K & 1 (2015)

With winter hopefully over here in Wisconsin (you just never know!) it is about time I share the winter inspired projects I did with my kiddos...

This project was inspired by this post via pinterest which was pretty minimal so I look things into my own hands!

I Can statement: I can tell you what a landscape is. I can show trees up close and far away using size and placement.

Day 1: Texture review, creating painted paper

We kicked off the day reading Snow Party by Harriet Ziefert and then reviewed what texture was. I also started to introduce landscapes.


After our book and our chat they got busy making 12x18 pieces of green painted paper with lots of tree textures.

Day 2: Talking about landscapes, Painting the background

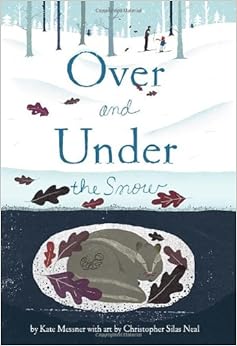
We read another BEAUTIFUL book called Over and Under the Snow by Kate Messner and then talked more about landscapes and what made something a landscape. Then they started creating a background for their forest.


I had them use a white crayon to draw their horizon line and then they sponge painted the snow with white tempera paint on a dark blue piece of 12x18 construction paper. When they finished the ground, I had a station set up to splatter paint the snow in the sky. If they were goofing around or getting paint on their faces on purpose during the splatter painting they were cut off. I used watered down tempera and big #12 watercolor brushes for the splatter. I use the technique where you get the brush nice and sloppy wet and hold it with one hand and then tap it with your other hand over the paper.

Day 3: Learning about size and placement, activity, and adding trees!

We read the book First Snow by Bernette Ford.


Then using the book I asked questions about why the trees were big or small in the illustrations and they gave me examples of where they see the same concept in their lives. To better understand the concept, and prepare them to add their trees to their artwork, I created a document in SMART Notebook for my SMART Board with a background very much like their paintings and variety of sized trees. They look turns coming up and placing the trees from biggest in the front to smallest on the top of the hill/horizon line. 


I 100% feel this activity helped solidify the concept and allowed for so many to be successful.

They got back their painted paper cut in 1/2 (so I have extra!) to create their trees from. They had to draw at least 3 tree triangles that were different sizes on the back. Then, they cut them out and glued them to their backgrounds to be biggest closest to smallest furthest away. They were also given strips of brown to be their tree trunks. It was fun to challenge them to make the biggest and smallest tree in their class! 

I also did this project with my Adaptive Art high schools students and it was really successful with them too!

Thursday, February 4, 2016

Adaptive Art: Line and Shape (2015)

This was a quick one day project I did with my High School Adaptive Art group. For the life of me I cannot find the pin on Pinterest that inspired this. But it was not my own :)


I did this earlier on in the year for a good test to see where my group of students were at technically. You can see it's a pretty big scale of skill, which makes planning difficult but always fun!

We worked on 12x18 paper. I had them trace different shapes that I had previously cut and then draw at least three lines from one side to another breaking up the shapes. They used watercolors to paint each new shape that was created by the lines. Oil pastels were used for the shapes and lines to help keep them inside the shapes when they painted.

Sunday, December 6, 2015

Adaptive Art: Fall Projects Wrap Up

Now that Fall is officially over here in Wisconsin, here is a wrap up of the fall projects I did with my group of High School Adaptive Art Students...

 These were created with one of my favorite kinds of brushes to use to get texture, especially with this group of students...

Find them here from Roylco via School Specialty
We used oil pastels for the trunks. Thinking the trunks should have been thicker or maybe paint. I would possibly do this with Kindergarten or First grade for a one day project and maybe adding more to the background...inspiration came from this image only post via pinterest

 This is a project that has transformed from one I did last year with my Kindergarten and First Graders that you can see the original post from here. However, these ones are a billion times cooler with the bubble wrap printed leaves instead of the paper ones. I do also really enjoy the grass added to the bottom. I had my Ks and 1sts do them this year too but forgot about the green! Stay tuned for that post.

 Another repeat from a project I did with Ks and 1sts back in 2013. See the original project post here. Didn't make any changes except for not including the wind.

 A super quick (30 minutes or less) but fun activity we did. I created tracers of pumpkins and leaves and they cut and did texture rubbings on them. Inspiration came from pinterest via this post.
 
We used texture plates similar to these.

 This was an incredibly fun one. We created painted paper (front and back) and used a variety of brushes and bubble wrap of different sizes for the leaves and then painted the tube roughly with brown for the trunk. The next class we cut out cloud like shapes from the painted paper and inserted them into slits I cut in the tubes. Inspired by this post via pinterest.

This was the first real flop I have had with this group....The picture on the left was from the pin on pinterest via this artsonia post...and the two on the right are the best two from my group. Either I didn't do enough modeling or this was just too much for them. Might try again next year in a simpler way.

And last but not least, one of my favorites.... We had talked a lot at this point about leaves changing colors and how and why and this was a really fun visual representation of that. I had a leaf tracer for them and then we used oil pastels to color and try to blend to get the transitions of changing. I thought this one was also Pinterest inspired but I cannot seem to find the pin. Maybe it was my idea!

I'm still learning with this group and 3 days a week for 45 minutes is a lot of time and lesson planning but it is teaching me so much and it is such a relaxing part of my day that I really cherish!

Monday, November 2, 2015

Halloween Projects Round Up!

We had a very busy and creative few days in the Art Room before Halloween! I had a sub day and early release day mixed in to Halloween week and the week before so we took a break from current projects and did some one day create and take drawings/projects.


Second, Third, and Fourth graders were given the challenge to take the basic Frankenstein and take it to the next level. I had the draw along you see below to help get them started and then they were left to their own devices! Inspiration for this came from here via Pinterest.


Kindergarten and First Grade took two classes on these, one to talk about texture and create the main pumpkin (using texture plates) and then finished up the next class with the string and leaves. Inspiration came from here via Pinterest.


 When Kindergarten and First were finished with their pumpkins, we read the hilarious book Monsters Love Underpants and did a collaborative monster drawing on the SMART Board and then some quick monster drawing on their own.


Last but definitely not least I bought pumpkins for my small group of High School Adaptive Art students and we taped them off with masking tape and used acrylic paint to paint different sections. The paint peeled some but no complaints from that group :)


And a few bonus artworks...one class of Kindergarten and First did the the spiders on an early release day and the pumpkin man was a bonus drawing a 4th grader did with some extra time. Spider inspiration came from here via Pinterest.


Hope everyone had a great Halloween!!

Wednesday, October 21, 2015

Adaptive Art: Tissue Collage Apples


I am absolutely loving my high school adaptive art class. I don't know why I was ever worried. These were a fun start of the year project they did with tissue paper, construction paper, and green tempera paint. The handprint was great sensory and they used an apple shaped traser to allow for greater success. 

Saturday, September 26, 2015

Adaptive Art: Finger Painted Self-Portraits

Part of my position in my new school district is teaching an Adaptive Art class at the high school. I see six students with varied abilities every Monday, Wednesday, and Friday for 45 minutes. While I have had a lot of experience in working with students with disabilities in my last district, never an Adaptive Art class. Needless to say I was nervous, but now I am finally settling in to working with them and finding projects and activities that meet their sensory and developmental needs.

One of the first things we did so I could get to know them, their abilities, and sensory stimulation was finger-painting self-portraits. It was so much fun! And one of my favorite things about this small group is that I sit and do the projects with them...


Stay tuned for more experiences with this amazing group of students!