While first, second, and third graders were busy working on their Summer in a Jar for the end of the year, fourth through sixth were busy creating these awesome works of art. Like the jars, this could also be a great project at the start of the year to help learn or refresh names and get a visual assessment of their skill levels.
I wanted something for them to do that they could work very independently on so I could get students that were missing work caught up and work on cleaning the room for the summer (and my eventual exit from the district). Before they started working I showed them some different examples of name art (see below) and told them my expectations. Challenge yourself, use the whole page, do your best work, and do something different. They could use any "dry" medium. And could use their full name, nickname, part of their name, or initials.
This is a favorite way to end the year for me because most of them really walk away feeling proud of their art no matter what style they did or materials they used!
This is officially my favorite project to do at the end of the year with 6th grade. They turn out amazing, and they all end up with a piece that they really enjoyed making and can be proud of.
For more info on the breakdown check out my original post on the project. The only changes were no planning sheet, incorporating their name, and adding sharpies to the material possibilities....
My goal this year with my 6th graders was to do more open ended projects in order for them to connect more to their art and to enjoy art more. This project was a really fun way to see them explore color and the color wheel and how they interpreted both...
Not sure where I developed this lesson from, probably the color wheel eyes and umbrellas floating around on Pinterest.
I Can Statement: I can create an alternative color wheel and use paint to mix secondary colors.
Day 1: I wanted to see how much information they retained throughout their elementary years of 3+ different art teachers, so I started with a blank color wheel and asked them to fill it out, no wrong answers, just telling me what they knew. After they were finished I played my FAVORITE color concept youtube video to "reveal the answers".
Then I asked them to go back and correct their answers and fill it in based on this color wheel which matched their blank one...
Once we revisited the basics, I posed the question "Does the color wheel have to be a circle?" This got all the gears turned and a ton of examples from the internet definitely answered the question that it certainly did not in fact have to be a plain jane circle...
The biggest requirement was that they mix the secondary colors and showed the six basic colors in an organized way that represented the color wheel... Then they got down to sketching!
Day 2: After a quick 1:1 with me and getting sketches approved they got to work.
Day 3-5: Lots of work time and artist statements once again (insert student groans).
I am so proud of the work they did on these, proud enough that I even took the time to hand write comments on each of the pieces (over 60!) It was worth the intense amount of hand pain!
I received an unbelievable amount of comments and praise from other staff and students and it was well deserved!
The only issue that arose during the project was that some students lost sight about the project being about the color wheel and color concepts and were just "mixing paint". But, it was my first time with this lesson and I should have put more emphasis on that. It was just so exciting to watch them create!
I attempted to give my older students more choice this year by doing more open-ended/prompt-like projects. This project was my first attempt with with my sixth grade students and I am pretty happy with the way it turned out!
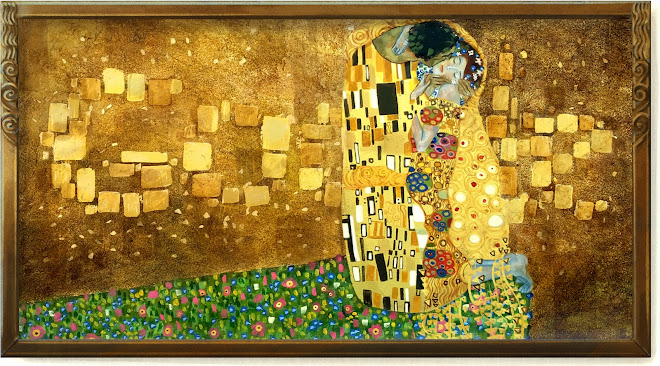
My inspiration for this project came from this pin on pinterest via Artsonia and wanting to do an art history piece as well. Eventually my brain took me to Klimt's The Tree of Life.
I Can Statements: I Can create a “Tree of Life” that reflects my knowledge, intuition, and experiences (WI L.4.1) I Can: Demonstrate openness in trying new materials in making works of art. (Nat VA:Cr2.1.6a) Day 1: We looked at Klimt's piece and did some fun fact background info about Klimt and I showed them this awesome article about the Google Doodle in honor of Klmit!
Then we started exploring "Trees of Life" from other cultures and what they meant to other cultures...
After doing some research on my own...I found this really great passage from a group that does...lets call it...spiritual classes...that really summed up my research well that I shared with students...
“The Tree of Life is a universal symbol found in many spiritual and mythological traditions around the world. In various cultures it is known as the Cosmic Tree, the World Tree and the Holy Tree. The Tree of Life symbolizes many things, including wisdom, protection, strength, bounty, beauty, and redemption”
I shared with them examples of all these different types from different cultures and then prompted them with this question... In each culture the Tree of Life or World Tree meant or did something different for it’s people. What would your tree do for you?
Here is a look at our planning sheet..
Day 2:
I did a short check in with each student before they started on their project. We talked about materials choice and how to make the purpose clear. I warned them they would be doing an artist statement so they would have to talk about any decisions they were making during the creation and why they chose the subject matter that they did.
Day 3 & 4: Solid work time!
Day 5 & 6:
This was their first time doing artist statements so we talked about what they were and the purpose of them and I gave them this planning sheet....
I really loved this artist statement from a sixth grader whom I will really miss!
The biggest (and really only issue) came at the end of the project when some students realized they just created a tree of their hobbies and favorite things rather than a tree with a "purpose". I really loved reading their artist statements and reading how they saw the work they had done and what they were trying to communicate in their work. I could tell so many more were invested in their work than a project that gave them limited choices and strict guidelines.
Click on this last set of pictures and take a closer look at the one on the left, you will not be disappointed.
UPDATE!
A great resource was recently brought to my attention... for more information on Klimt and to view more of his works visit Klimt's page at Artsy.net!
Like I mentioned in my 5th grade snowflake fail post....Both 5th and 6th grade just finished up pretty lengthy projects before this, so I wanted to do a little more of a short and sweet/cut and dry project to re-inspire my students who get frustrated with long projects that are a higher skill level. When I saw this project via Pinterest and this post I knew it was the route I wanted to go with my 6th graders...
I Can Statement: I can use Kirigami to create advanced paper snowflakes
Day 1: Started off with an intro to analogous colors, specifically how warm and cool colors are two sets of analogous colors. We also talked about the different moods the colors created. I wanted to get them thinking a little more advanced art classes so we taped our paper to the drawing boards like I did in all my collegiate watercolor classes and the reasoning for doing so. I did a demo of approaching the painting in different ways via a more random approach or patterns and lastly, we talked about the science behind the salt's reaction to the watercolors. All this was essentially to create a background for the snowflakes but great chances for learning opportunities. When they were done with their backgrounds they had the rest of the time to see if they knew how to cut snowflakes and different methods for doing so.
Day 2: Intro to Kirigami and a little history with it. Kirigami is the Japanese art of cutting paper, named from the words "Kiru" (to cut) and "gami" (paper). Its a 17th century art form and considered a true art form in Asian culture. Essentially its Origami but with the key difference cutting and gluing. The 6th were surprised to find out it was originally a wealthy persons art form due to the cost of paper and now it is considered the cheap man's art. I showed them this youtube video I stumbled on and we were all mind blown by it...
Clearly it was what they could work up to if they ended up being freakishly good at cutting paper. I also talked about a paper cut of a horse my sister has and how ridiculously expensive it was but, to consider the work that went into it to make it that cost.
Now when it came time to cut, I wanted these to be awesome, so I did some research and found a really cool way to fold snowflakes and get some incredible results almost every time. I was able to take screen shots and create a packet for my students to look at if they got stuck on their own designs but here is the online version. I wish more would have trusted themselves to do their own designs but they still turned out fabulous...
Day 3: When they were ready to glue their snowflakes down we figured out the best strategy was to use your fingers to spread the glue while your snowflake was on the table, not the art work. Because of the nature of watercolor if enough glue got on the paint it rewetted and got paint on their snowflakes.
When they were finished they worked together in their choice of groups to created these giant snowflakes to be hung throughout the school with different winter projects. They did these with no instruction from me just instruction packets I put together. I of course stepped in when frustration set in with some groups! You can find the steps basically anywhere if you google giant paper snowflakes. Here is one of many tutorials.
Every once in awhile (and usually with older students) I have projects that cause students to work at drastically different paces and I end up with half the class needing one more day and the other being finished. When this happens instead of "free art", I come up with a one day activity that the students can take with them that usually involves simple materials like coloring. I don't asses these projects, nor do I hold on to them for any time. My students also know that if they don't finish the activity in that class they take it with them done or not.
Sounds like busy work right? From an outside perspective it usually does but I try to connect these activities to the project they just finished making it an EXTENSION of that project. I also think the students really enjoy these because they know that they can get silly and really think outside the box and not feel any pressure. Plus they get really excited when I snap a picture of it and tell them it might end up on my blog!
Here is the most recent extension I did with 6th grade after they finished their Keith Haring!
I introduced postage stamp art to them (a few were like "what are stamps?" GASP!) and watched part of this youtube video (about two minutes) of how they are made.
I showed them a few examples of famous art that has appeared on stamps and art stamp series. Then they had a choice of designing a page of stamps or a single stamp that reflected either Keith Haring or if they were famous artist, the stamps that would be designed for them. I think Keith would have loved stamps with his art on them!
Here are a few pictures! P.S. This was right before Halloween ergo the pumpkins!