I Can Statements:
I Can create a birdhouse using 5 or more shapes.
I Can identify the shapes I use in my birdhouse.
I Can create a birdhouse using 5 or more shapes.
I Can identify the shapes I use in my birdhouse.
Day 1: Painted Paper!
I recently just got to the painted paper party so we had to take an incredibly fun week in Kindergarten and First to make a lot of painted paper. Each day in the rotation was in charge of one color. Each student got to make a 18x24 piece of paper that got cut down into 4 smaller ones when dried.

Day 2: Birds!
They did a bird draw along with me straight with sharpie. While drawing, we talked about all the ways they could make them different and give them different personalities even though they were all following the same basic drawing. For painting, they used smaller brushes and all colors were made available. I wasn't planning on the birds being more than three colors, the plan was body one color, wings and tail another color. However, I forgot to say that and it naturally took off to paint them in any way possible! Some ended up with stripes, some with polka dots, and some with every color. They turned out more beautiful than I imagined, after all, this year was really about letting go and this proved to me the magic that happens when I do.

At the start of this class we had a really great time looking at a LOT of different birdhouses. I tried to find the greatest variety of colors, sizes, shapes, designs, and themes and after looking at the images we made a list of what a bird house had to have.
Here is what they came up with:
1. Hole for the birds to get in
2. Roof
3. Main house
4. Walls
We also came to the really excited conclusion that they could look like ANYTHING!
After this amazing discussion took place I talked about creating our bird houses using shapes and all the shapes they know and can use. Then they watched my demo video of constructing my house. The big take away of the demo video was drawing on the white side of the paper. I did provide circle tracers but all the rest of the shapes were drawn free hand.

(Assembled birdhouses without oil pastels or birds)
Day 4: Put a bird on it!
On this last day we started with a brief shape assessment, I handed back houses and gave them the assessment you see below and they counted up their shapes, wrote them down, and handed it back to me with their name on it.

After we got that out of the way it became the best day ever! They got their birds back, still on the white paper, and they watched my demo of decorating my house and adding my birds. I highly encouraged them to use all the lines we focused on a bunch throughout the year as well as patterns and themes. All the decorating was done with oil pastels and black sharpies. I did put the paper back out this day for them to add more shapes if they needed/wanted to add more.

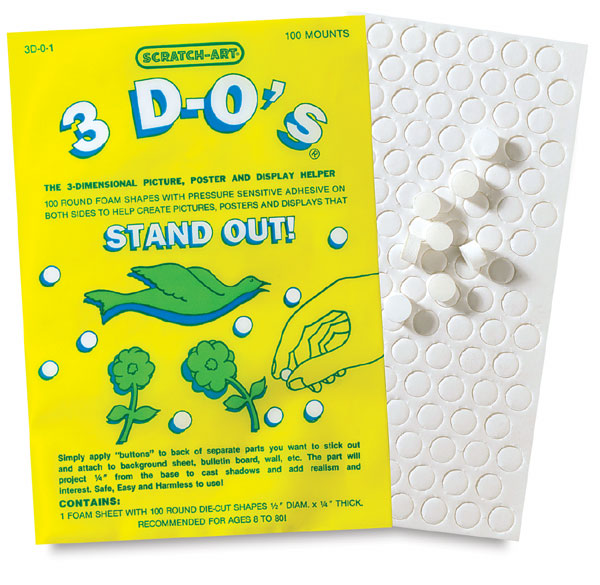
My favorite part was them attaching their birds. Most kiddos painted two birds so I gave them the option of using both or just one. They attached them using one of the coolest art supplies ever--3D-Os. Sold here by Dick Blick or School Specialty. They are a foam circle with adhesive on both sides, they give a subtle 3D effect by hovering about a 1/4 inch off the paper.
On this last day we started with a brief shape assessment, I handed back houses and gave them the assessment you see below and they counted up their shapes, wrote them down, and handed it back to me with their name on it.

After we got that out of the way it became the best day ever! They got their birds back, still on the white paper, and they watched my demo of decorating my house and adding my birds. I highly encouraged them to use all the lines we focused on a bunch throughout the year as well as patterns and themes. All the decorating was done with oil pastels and black sharpies. I did put the paper back out this day for them to add more shapes if they needed/wanted to add more.

My favorite part was them attaching their birds. Most kiddos painted two birds so I gave them the option of using both or just one. They attached them using one of the coolest art supplies ever--3D-Os. Sold here by Dick Blick or School Specialty. They are a foam circle with adhesive on both sides, they give a subtle 3D effect by hovering about a 1/4 inch off the paper.

In the bottom left birdhouse above the student accidentally cut off the bird's legs and this was his problem solving solution! YES!


Bottom right and top above, Lots of "love birds" appeared in first grade...

This lesson/project was SO FUN and colorful and the students loved it as well.