Pages

Showing posts with label Line. Show all posts

Tuesday, August 16, 2016

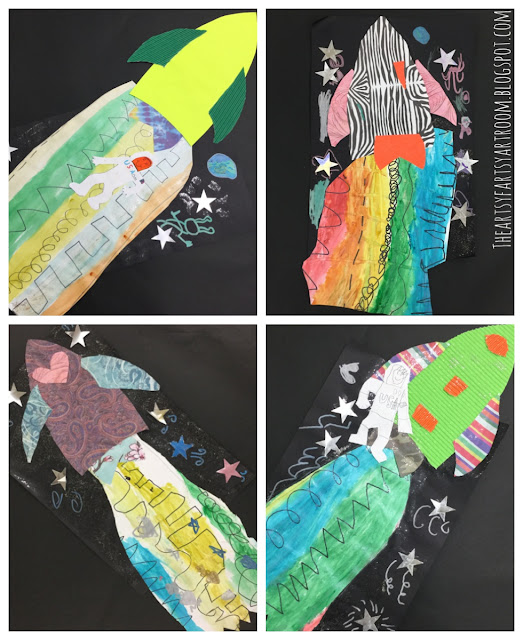
Shooting Line Rocket Ships (15'-16')

This project (inspired by Art with Mr. E's) is officially one of my new favorites for K&1. It was a great review for lines and a super fun exploration of materials!

I Can identify different types of lines.
I Can explore many different materials.

Day 1: Reviewing lines. Line paintings.
Lines are one of the first things we visit in the year so I love doing a refresher project on them at the end of the year. To kick this project off I drew a picture on the SMART Board that contained all the lines they learned previously and they took turns coming up and finding them. Then we did some whole body fun by having groups of students make the different types of lines with their bodies! Just an observation: my classes that were most behaviorally challenging ended up doing the best with this activity.
Dashed and Zig-Zag
Castle and Thick Line
After these activities they went to their seats and drew each type of line with a sharpie. Then they got to explore their first new material--metallic watercolors. Not really a "new" material as far as watercolors go but still VERY exciting for them to see sparkles and shine! I really encouraged them to have their colors touch but it was a little hard of a concept because many just tried to follow the line and not make the bands of color. I also had a glitter tempera paint station set up for them to add MORE sparkles if they wanted. Obviously they wanted it.


Day 2: Building Rocket Ships. Assessment.
Tracers. I always go back and forth on using them or not. But, an old principle (and art department head) once told me that as long as the learning goal isn't creating that specific shape they are ok. So, that's what I did. Each part of the rocket ship had a tracer: the main body, the wings, and the booster. After they watched my demo video on using the tracers and gluing the pieces together I let them run wild with a huge variety of papers with different textures and patterns. This was our second material that they explored.


Because the process of building the rockets was very independent, I used this time to pull students over to me for a verbal assessment to identify the different types of line. I had the lines drawn on a piece of paper and they went through and named as many as possible. Each student took about 30 seconds or less which made a very quick and easy assessment. The one little bump was a student would come over to ask me something while I was assessing another and they would spit out the answer before the kiddo getting assessed could answer.


Day 3: Adding the rocket streams and backgrounds.
 We started the day talking about creating the rocket stream out of their line paintings. Again they watched my demo video and brainstormed the different shapes the stream could be and how it was okay if we cut some of our lines off. Then they added their rocketship to black paper and added some amazing details with our last material exploration -- metallic markers. I pre-punched stars on metallic paper that they could add as well and more tempera glitter paint. One last option for them was adding an astronaut. Again, I provided a tracer. The success rate overall on this project was so high and each was its own beautiful individual work of art with so much personality showing through.


Below are detail pictures...I was so blown away by some of these kiddos!!!!


Thursday, February 4, 2016

Adaptive Art: Line and Shape (2015)

This was a quick one day project I did with my High School Adaptive Art group. For the life of me I cannot find the pin on Pinterest that inspired this. But it was not my own :)


I did this earlier on in the year for a good test to see where my group of students were at technically. You can see it's a pretty big scale of skill, which makes planning difficult but always fun!

We worked on 12x18 paper. I had them trace different shapes that I had previously cut and then draw at least three lines from one side to another breaking up the shapes. They used watercolors to paint each new shape that was created by the lines. Oil pastels were used for the shapes and lines to help keep them inside the shapes when they painted.

Saturday, January 2, 2016

Fall Arm Trees with K and 1st (2015)

POST #175! WOAH.

Okay still running behind on fall project posts...again, thanks to break for me catching up!

A fall favorite and good line intro/review for my Kindergarteners and 1st Graders. I did a similar version of this project in the past but it develops and gets better each year.

I Can Statements: I Can identify different types of lines. I Can use 5 or more different lines in my tree. I Can use watercolors appropriately and correctly. I Can follow directions to print with bubble wrap and brayers.

Day 1: Read "Lines that wiggle" and drew the lines in the book with our arms in the air as we read. Had them take the sheet below to their spots, I named a line and then they had to trace it before finding the same line on the floor and walking across it. I put the lines on the floor with vinyl floor tape the week before and they are still there almost 2 months later, and after many floor washings. It's good stuff!


Back to the carpet to watch the demo for tracing their arm and adding 5 or more different lines with brown oil pastel.

Day 2: I drew a picture on the SMART Board made up of all different lines and a key. Called kiddos up to find a certain line in the picture and circle it or X it. They seriously loved this. After this activity they did the watercolor on their trees and sky. 

Day 3: Read a new favorite book "Fall Is Not Easy" and they watched a demo of how to use the bubble wrap to do the leaves on the tree. I had a station set up in the back of the room for this and they would put the paint on their bubble wrap there and carry it back to their spots to add it to their tree. 

Resources:


Monday, February 9, 2015

Collaborative Continuous Line & Shapes

As mentioned in my post about the project "Ish" I did with my 2nd and 3rd graders. I attempted to do a collaborative project with another Elementary Art Teacher in the district and it totally failed. We had it all planned out but when you only see a group once every 6 days plus the weekend...It is hard to make sure everyone did one and get all the art where it needs to go. BUT! I made it work. Instead of collaborating with another school we just went across classrooms and another grade level. The inspiration came from Pinterest that originated over at Splish Splash Splatter!


I Can Statements:
I can use continuous line to start a collaborative project
I can identify geometric and organic shapes and use them in a collaborative work
I can use tints and shades to color in organic and geometric shapes

Day 1: Started off by showing some amazing art work of all different subject matter and had them try to figure out what they all had in common. Eventually, one kiddo in every class had the light bulb come on and figured it out that they were all created with one continuous line!
 
To start work time I showed them a video demo of me using a sharpie to fill a paper with one continuous line that was crazy but not crazy enough that it looked like scribbles. (P.s. If you do video demos, fast forward through parts, they think its hilarious!) Then they got busy creating their own. At this point we would have traded with the other school for them to add the shapes and potentially color as well so I did the "Ish" project as something to do during that exchanged time. It was during this class that we started the "Ish" project with the Tumble Book and planning sheet.


Day 2: "Ish" Project! This is where we would have done work on the other schools projects but FAIL.


Day 3: Shape time! Started with a slideshow about organic vs. geometric shapes that had some pretty neat animations of the shapes and objects transforming. Once that discussion was over we did a fun activity where I gave each student a different shape that was cut out of construction paper and laminated. They had to move to different places in the room depending on the kind of shape they had. After this activity they each took turns coming up to the board to draw a shape and choosing another classmate to guess geometric or organic. After all this excitement they got someone else's continuous line artwork and had to trace two of one kind of shape and one of the other. My not so great listeners added more shapes but stuff happens! A little art making, a lot of learning this day.

Day 4: Coloring! Started off the class looking at this Tints and Shades page of this awesome PDF I got on TpT via Brownie Points (Nicole Brown).


We talked about how when someone traced a big shape over the top of their continuous line it became a bunch of little shapes. And each big shape was one color broken into tints are shades inside those little shapes. The only demo was showing how I could get three colors/values with just one pencil. Some 2nd graders struggled with coloring but all in all there was success.

Day 5: Because of the intricacies in a lot of these we needed a second day to color these and finish up "Ish" and other projects.

McDill...


Jefferson Elementary...


Sunday, January 25, 2015

1st Grade Roller Coasters with Science Integration

I've been working a lot this year with the 1st grade classroom teachers to integrate what they are doing in the classroom into the Art room. I probably have the best relationships with them than any other level in the building which makes integrating a lot easier. The negative I am dealing with is that both of my buildings in the district don't do the same curriculum at the same time. So while I'm making awesome connections at one building, the other doesn't get quite the same impact. 


This project with first grade has probably been the most successful integration so far. The unit in science they were working on included forces, simple machines, and pushes and pulls. It was like alarms going off in my head to connect a project to this unit because of the endless possibilities. After talking to the first grade teachers and bouncing ideas around I came up with doing a roller coaster. I once upon a time pinned this and this roller coaster idea which likely gave my brain some input on the project, especially with the passengers :)

I can statement for this project: I can use different types of lines and imagination to create a roller coaster.

Day 1: Started with reading this graphically beautiful and silly book Lines that Wiggle (on amazon)


Then I started giving them clues about what we were going to be doing for our project...
"It is something made up of lines"
"It works with pushes and pulls and forces"
"You can ride it"
Etc...
Pretty quickly after those three clues they figured out it was roller coasters and I put up this PDF that we searched for different lines in...
Then diving into the science part of it we figured out where all the pushes and pulls would be and what parts of a roller coaster are what simple machines. It was pretty amazing listening to 6 and 7 year olds talk about roller coasters in that context! Then the art making! I did a demo of drawing a coaster and going over it in a paint color, after they had been working for awhile we road this roller coaster :)


Day 2: Started with another roller coaster ride from a local small amusement park in Green Bay, so some of the kids have actually ridden in :)


We looked at our paintings and talked about the lines we used then I demoed cutting "riders" out of the magazines and creating the carts for the "riders". They could choose whoever or whatever they wanted to ride their roller coaster which made for some very silly results :)

McDill Elementary...


Jefferson Elementary...


Monday, December 1, 2014

Fall Arm Trees

Fall is officially over in Wisconsin but it still decorates the halls in my two buildings!


I was really excited to try my own version of this project I found on Pinterest here via Georgetown Elementary Art Blog. I wanted to stick with the original idea of types of lines but because I knew I wanted to do it with Kindergarten I changed the types of lines to just the tree and the materials to oil pastels and watercolors for their first watercolor resist artwork (my favorite!).

I Can statement: I can draw different types of lines

Day 1: We started the lesson with a book about fall. I really didn't like the one I used (frankly it was a last minute find) so I don't even remember the title. I am on the lookout for a great book about fall thats a quick read for Kinders that show a lot of trees. Then we looked at close up pictures of trees via one of my quick reference PDFs...

We talked about all the lines they saw in the bark and what the names of some of those lines might be. Before they started their own trees with lines we practiced naming and drawing them by tracing them in different colors on this sheet... (made on my iPad could be done in a basic drawing app I used Brushes)

The last step for Day 1 was tracing their hands and filling them with the different lines and going over them with oil pastels. This was the first time using oil pastels for many of them!

Day 2: Watched the leaves changing time lapse I used in many of the other classes for their fall project...

After the video, I did a demo of what happens when watercolor goes over the top of oil pastel. MINDS BLOWN. And what would happen if the blue and brown mixed if they didn't take their time and stay away from the brown while it dried. The rest of the time they painted, again a first time with watercolors for many!

Day 3: A little time at the end of the next class was used to cut leaves and add them to the now dry trees.

I love watching Kinders use something they never have before they get so darn excited!

Jefferson Elementary...hung with second grade project...


McDill Elementary...Hung with second grade project and this third grade project...


So anyone have ideas on a great fall book for Kindergarten? Specifically about trees/leaves? Not a big fan of Louis Elhert's writing (doesn't flow enough for me) but love the pictures...