Here is a look at the "Artist Book" I created for my second graders to use each time they are introduced to a new artist. Second grade curriculum is all focused on artists so this is a great way to track what they learned.
The two updates on this are when they fill out the 1st side of the page, and what is written on the second page for them to fill out when they finish their work.
When we start the year with our first artist they get the cover page and their first empty page. They fill out just the front of the page the 2nd day that we talk about the artist as a review. It seems to be just the right amount of writing for second grade. We fill out most of it together on the SMART Board and they are responsible for doing only the last question entirely their own.
When they finish their project they fill out the 2nd page and fill out the rubric for the project independently .
The pages are pre-3-hole punched and the books are held together with brad fasteners. Each page gets added as we go. As a side note, if students are behind on projects I do the writing for them, they dictate to me to save time.
This is a favorite project for me that will probably be a repeat every year---it's a good way to get my 2nd graders to just relax! Check out my previous posts for this project here and here.
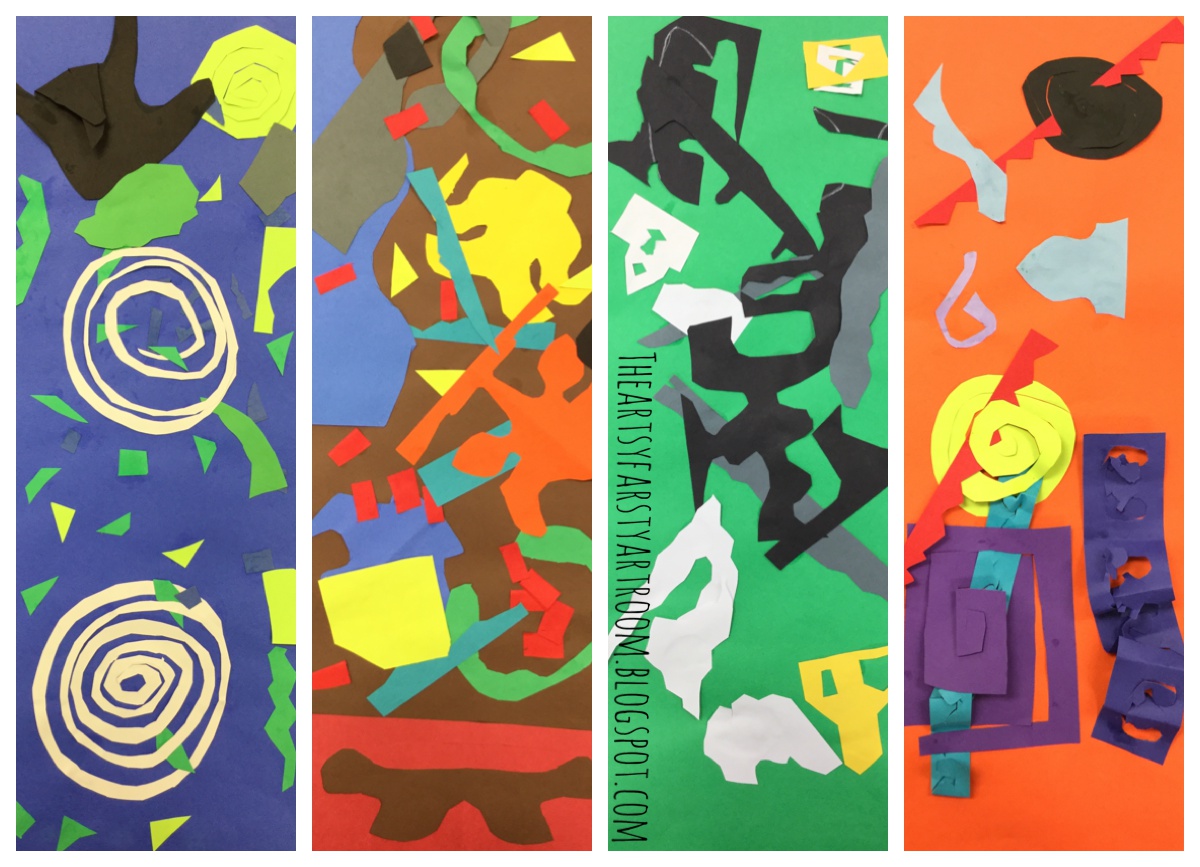
Made a few big changes to the project including a pretty big emphasis on geometric and organic shapes and using glue sponges.
I Can tell you something about the artist Henri Matisse.
I Can cut organic and geometric shapes.
I Can identify and sort organic and geometric shapes.
Day 1:
Introduced Matisse with this great video!
Then we looked at his artwork and discovered that he used a lot of shapes and dived into organic vs geometric. After we talked about organic and geometric shapes, they paired up with dry erase boards and I put different shapes up on the SMART board and they had to identify them as organic or geometric. After a few rounds of that, I showed them my example and told them to start cutting (without much instruction) and gave them a large envelope to keep pieces in.
Day 2:
Reviewed organic and geometric shapes using Plickers (USE IT, you only need 1 device!). As a review of Matisse they filled out their artist book pages,which have gotten a little revamp from last year. I'll update on those soon. After their page was filled out I showed them my demo of cutting a variety of shapes and sizes in different ways to get their wheels turning. They spent the rest of the time cutting away and adding to what they already had cut last time with reminders to be cutting both organic and geometric.
Day 3:
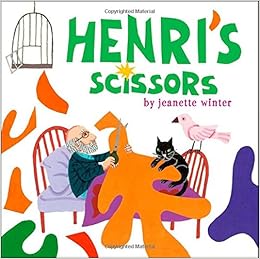
Reviewed the shapes with a little shape sorting as a whole class using laminated shapes. Then they heard a Matisse book that I highly reccommend. Henri's Scissors by Jeanette Winter, found here on Amazon.
After the story we watched my demo video of arranging and gluing and talked about composition. "Bad" examples are always important during this step for my kiddos to really understand what makes a composition work (and not work).
The second big change for the project was using glue sponges to assemble their artworks. It made a HUGE difference in craftsmanship and glue amounts...i'll NEVER go back for this project. Not everyone finished gluing so I had them toss out or take with their extra paper that they weren't using on their projects and only had them put the pieces they were using on their projects back into their envelopes.
Love this little section--started off as a gun (a no go!) and transformed into a spigot!
Day 4:
Students who didn't finish last time had time to finish and we wrapped up by filling out part 2 of our artist book page and filling out a rubric for the project that included a shape assessment. Check it out, let me know what you think. My elementary art team has been working super hard on developing rubrics this year...
Love love love love LOVE this project. The color! The shapes! The movement! They just can't go wrong...
The last few weeks of the school year are in full swing. All 400ish portfolios are handed back which means one day-no grade-"Take it with you please!"-projects are happening all over the place.
THIS is my favorite. Any class that was caught up and had a day or so left with me are making these wicked awesome paper sculptures. HUGE thanks to the ever brilliant shine brite zamorano for the inspiration via this post from pinterest.
These were done with a variety of K-4 classes and were incredibly open ended. I made the video below (Sorry I don't do sound!) to show them some of the basics and just "required" them to do two pieces of paper as the base. The two paper rule was to give it a little weight so they wouldn't lift when they started gluing. Everything else they did was up to them. Most students went abstract but I had a few do playgrounds, roller coasters, houses, and masks.
The only two negatives were the prep of cutting all the paper and having K & 1-ers wanting to do the cylinder and having difficulty gluing it down with enough glue to keep it on. There was a lot of end of the world tears when that happened.
My FAVORITE thing that happened was no one asking to do free art in my 3 & 4 classes because they were so completely engaged (which says a lot for the last 3 weeks of school).
HIGHLY recommend this as an end of the year project, if you have any paper left that is!
Mondrian can be a little boring but this project always puts a fun twist on him that keeps students engaged...check out my original lesson here with links to where I got the original idea. I also did another awesome Mondrian project with my old 5th graders that you can check out here.
I Can tell you something about the artist Piet Mondrian
I Can name the primary colors
I Can create a creature out of a Mondrian inspired painting
Day 1: Intro to Mondrian including using the awesome video below....
After filling out their artist page they set up their papers so they were ready to paint next class. They each had a 9x12 piece of paper and had to draw at least 3 vertical and horizontal lines that touched each side. They also added more lines that didn't go all the way across to make for a more interesting composition. I did this with them using my document camera and we really focused on using our ruler correctly to get straight lines.
Day 2: Another AWESOME video. Review of primary colors. Then painting the primaries.
This video is probably their favorite.
For painting the primaries, I had each individual primary color of tempera paint on 2 tables and students moved to the color they needed to use. (A simple easy way to incorporate movement!)
Day 3: ANOTHER awesome video. Painting the black lines and practicing their creature.
For painting the black lines, I had multiple widths of flat brushes for them to use for more line variety. When they finished they got a 9x12 scratch paper to practice drawing whatever they were going to turn their painting into. Students that were absent somewhere in this process used a thick sharpie to draw their black lines instead of painting, this really helped to catch them up.
Day 4: ONE MORE awesome video. Creating the creature day one.
This one is MY favorite.
On the back of their paintings they drew their creature as big as possible and cut it out. I had all colored scraps, silver paper, string, and sharpies for them to add more details.
Second graders loved Robert Wyland so much that we did two projects inspired by him. Out first was Warm and Cool Waves, the second were these AWESOME underwater self-portraits inspired by this, this AND this project via pinterest.
I Can statements: I Can draw a self-portrait with my features in the correct places. I Can draw a sea creature realistically.
Day 1: To kick off the project we looked at portrait photographs that were taken underwater and discussed what looked the same and different as above water.
I showed them this video of Wyland painting underwater to connect back to Wyland. How freaky and awesome would it be to paint underwater!?
After all this chatting we got to work drawing the self-portraits. I did a draw along with them up on the SMART Board to help guide where to put features and how to draw the snorkel and mask.
Day 2: I checked out a large variety of sea animal books from the library and had them look through the books and choose a sea creature they wanted to draw. Before they added it to their portrait they had to practice drawing it using the books and attempt to make it look more realistic. I really pushed drawing from the images and not from their minds. This was a little difficult of a concept for them, but by the last group of 2nd graders, I finally found the right way to describe what I meant. When their practice was done I gave them their portrait to add the creature to. Nearing the end of class we came back together to talk about what good coloring looks like with crayons and how to achieve it so those that were ready to color could start.
Day 3: Refreshed our coloring discussion and then they got busy coloring. When the first few were done coloring, I showed my demo of using liquid blue watercolor to do a wash over the entire page. I really made a point to explain that any paper that was showing was going to turn blue so "bad coloring" would be really visible. Make sure they color the white of their eyes or their will possibly be tears when they turn blue....
These just make me so incredibly happy to look at!
To hit the 2nd grade curriculum of a contemporary artist and a social artist I introduced them to Robert Wyland. They were pretty pleased to do an artist that was still alive :) Project came from here via Pinterest.
A little background on my project choice...for those of you in the Educator Effectiveness world (EE) our SLO as an Elementary Art team is one that travels with a group of students from 1st to 4th. Last year it was based on Primary/Secondary Colors, this year Warm/Cool and next year will be Complementary. Therefore, I needed to do a project about this time of year that used warm and cool colors to help reinforce!
I Can Statements: I Can tell you something about Wyland. I Can identify warm and cool colors. I can paint a sunset with warm and wave with cool colors.
Wrapped up our O'Keeffe project with a group hamburger critique (more on that later), and moved on to learning about Wyland. Because he is still alive there are some awesome resources out there... we watched a few video clips to help learn about him...
He really allows for great discussion about what inspires people to paint different things and I had some really great conversations with students about this. Wrapped up intro day with free drawing ocean artwork...
Day 2: Intro Warm and Cool Colors. Drawing and painting wave (cool colors).
Had a few slides showing the separation of Warm and Cool and the trick of associating fire and water to the two groups to help remember them. Used this Youtube video as well..
Then they started drawing and painting the wave. I had them do pencil first and trace in black oil pastel. For paint, I really wanted them to play mad-scientist mixing wise to understand that the cool colors all "like each other" so I used really watered tempera paint. I gave them teal, blue, purple, and green to share as a table and then their own mixing cup. Because the paint was so watery craftsmanship was a big problem for some 2nd graders.
Day 3: Review Warm and Cool. Painting sunset (warm colors).
We did two quick review games before they moved on to painting the warm colored sunset. In my last district we had a ton of donated paper of all different color varieties so I made 6x6 laminated squares of basically every color I had. Our first review game was me turning around really fast with a color and they had to do "Brrrrr" arms if it was cool and fan themselves off it was warm. Next I passed out the squares randomly and they had to sort themselves into Warm and Cool.
After our review they painted the sunset. We traced a circle lid with a warm colored pencil to be the sun and then worked our way from yellow to red and mixing in between to paint the sunset. They used the watered down tempera again for this in red, yellow, and orange.
REALLY love how these turned out and all the different varieties in the waves. Plus they were totally psyched to be doing so much mixing.
Here is a look at the "Artist Book" I created for my second graders to use each time they are introduced to a new artist. Second grade curriculum is all focused on artists so this is a great way to track what they learned.
When we start the year with our first artist they get the cover page and their first empty page. They fill out just the front of the page when the artist is introduced and then when we finish the project they complete the second page.
The pages are pre-3-hole punched and the books are held together with brad fasteners. Each page gets added as we go.
It seems to be just the right amount of writing for second grade. We fill out most of it together on the SMART Board and they are responsible for doing only two sentences that are entirely their own. I used to get complaints from students about having to write in Art but the longer I am teaching the less of those comments. I think because we are starting to put literacy in every subject they just go with the flow.
Okay so I'm a little behind posting since we did this in fall....but that is what break is for!
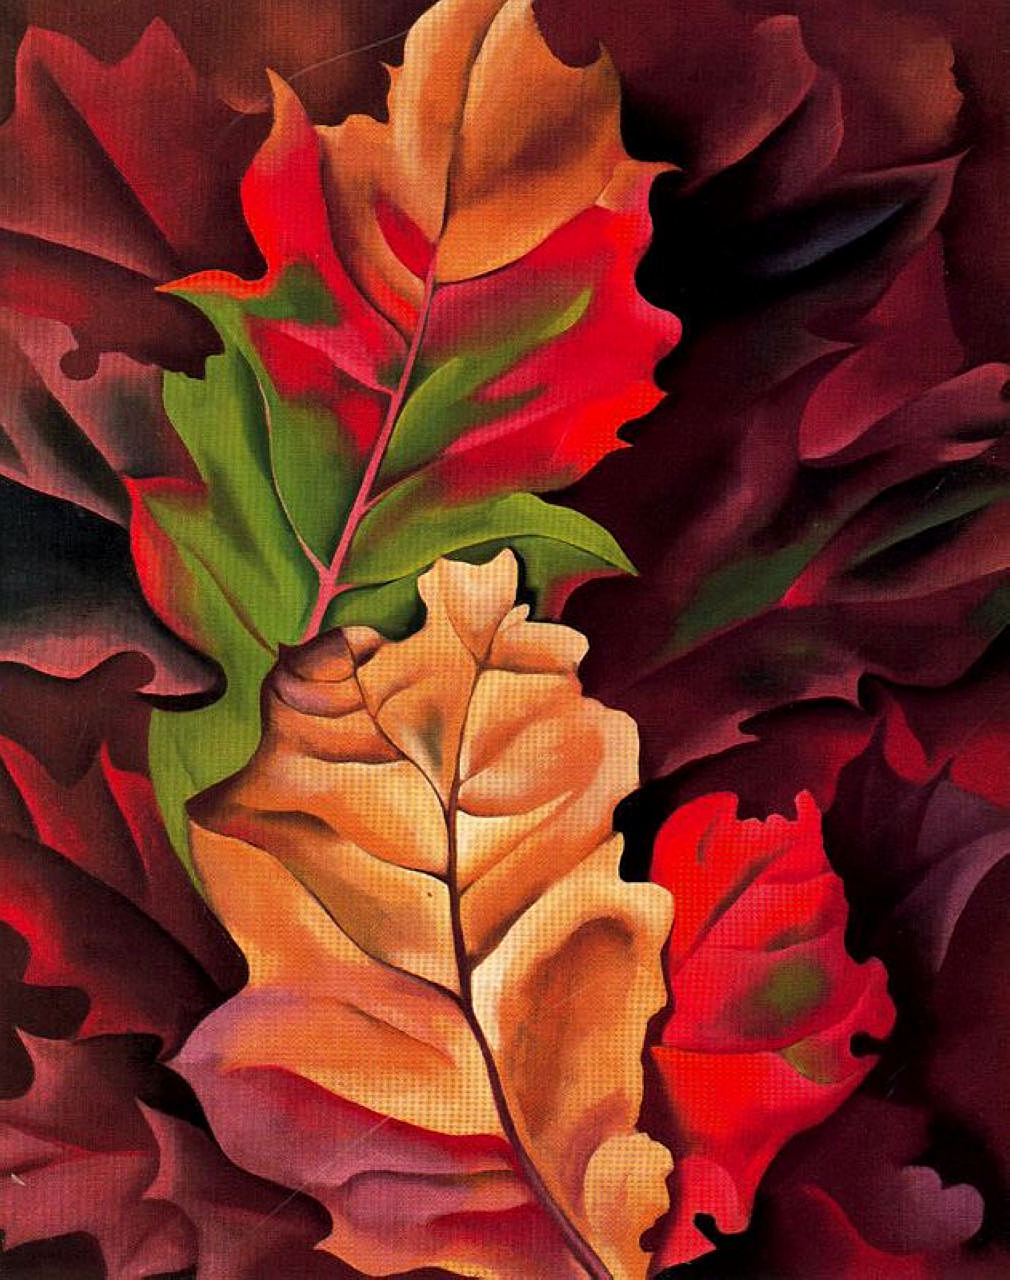
Second grade Elementary Art Curriculum is focused on artists. After we wrapped up Matisse and our paper cut-outs we moved on to Wisconsin's own Georgia O'Keeffe.
I Can Statements: I Can talk about Georgia O'Keeffe. I Can practice drawing many different kinds of leaves. I Can draw my best leaf using the whole back of my paper. I Can add details and an outline to my leaf with my best craftsmanship.
The project is based on one of my FAVORITE O'Keeffe paintings....Autumn Leaves, Lake George
Day 1:
Learning about O'Keeffe and filling out our Artist Book, Talking about fall color schemes, creating painted paper
Day 2: Practicing drawing leaves with the worksheet I made below then drawing the best one on the back of the painted paper they made, adding outline and veins with black tempera paint and flat head brushes
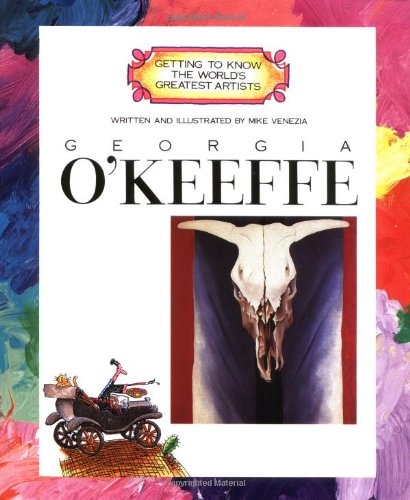
Day 3: Read slightly longer (but awesome) book from the Getting to Know The World's Greatest Artist series: Georgia O'Keeffe then had kiddos that didn't finish last time finish.
Resources I used:
Awesome bio video with her art and stop-motion animations, I read aloud the things that were written.
Wanted to share what my students did the few days leading up to break....
I really like the way I managed my holiday projects this year. The last day I saw each class before break (unless they were really behind on projects) we did holiday art. Kindergarten and 1st grade did the trees and I set up 2nd through 4th so they could choose from a variety of projects.
I have been doing video demos of projects this year where I record myself ahead of time.... I didn't want to take the time to do that for these projects, butI did take pictures and showed them a step-by-step slideshow. K and 1st just saw the tree and 2nd-4th got to see the step-by-steps for each project so they could decide which ones they wanted to do. I have a really large room so it was was easy to set up each project in different sections of the room.
The tree inspiration came from this image via pinterest. I pre-cut the strips and then hid the scissors so they had to approach it like a puzzle. The bottom right was done by a 1st grade kiddo with special needs and I about cried when I saw how awesome his turned out! This was the project for K and 1st but 2nd-4th could do it as one of their choices.
The name in lights project was the definite favorite. This one also took the longest depending on how many lights they drew. Everything in black is draw with sharpie and then the lights in washable markers. A little water with a paint brush over the top of the markers and it looks like they are glowing. Too much water was an issue for a lot of kiddos who didn't seem to hear the warning about too much water and the water dripped all over the page and took the marker with it. I cannot for the life of me find the Pin on pinterest that inspired this project.
Paper quilling is seriously one of my favorite forms of art. I wish I would have taken more pictures of these! I started with them using a heavier paper (80lb) and the paper was not holding great, so I switched to a 50lb and the results were much better. The students that chose to do this were VERY into it.
I did a little quilling of my own during one of my really well behaved classes and turned it into an ornament!
I had a group of 3rd grade boys that asked to do legos for a majority of the time and I agreed only if they built whatever I challenged them to build. This was the Santa challenge. I am blown away what kids can do with legos. Anyone who says legos don't belong in an art room needs to reconsider!
These are the ornaments that the other two elementary art teachers that I am SO blessed to work with made for me this year!
And my hand-made ornament for family and friends this year!
Hope you have time to get a little creative yourselves this break, even if it's a new adult coloring book you got as a gift! I got 3!
For my classes that were ahead before Thanksgiving we created Thanksgiving Turkey Art...
Kindergarten and 1st grade made Turkey Hats and 2nd and 3rd graders were challenged to make extraordinary turkeys by changing their feathers or dressing them up!
We watched this AWESOME art Thanksgiving story called a Plump and Perky Turkey by Teresa Bateman Illustrated by Jeff Shelly. It is about a town tricking a Turkey to come to town to be eaten by having him model and judge an art fair! Save this one for next year, it is THAT good.
I love seeing their creativity burst at the seams with this one day project!
In my new district, Elementary Art curriculum for 2nd graders focuses on artists and art history. To kick this year off I started with Matisse. There is just something about all his artwork, from paintings to paper cut-outs, that elementary students enjoy. I think color is a big part of it but his artwork is also almost all positive and when they find out his life story (i.e. the wheelchair) my students get really inspired.
You can see my original post of my first time with this project here.
I did make a few changes including changing the background paper to a color of their choice, not reading/ watchingWhen Pigasso Met Mootise (I'll save that for Picasso), and instead reading them this new book in my collection Henri's Scissors by Jeanette Winter, found here on Amazon.
This is an amazing project for watching students explore and create. I don't give any limitations for cutting, gluing or dimensions as long as the paper color doesn't match and they use the entire paper. Because of this, and the idea that they can literally do nothing wrong, they EXUDE confidence during this project. A great project and feeling to start the year with.
We had a very busy and creative few days in the Art Room before Halloween! I had a sub day and early release day mixed in to Halloween week and the week before so we took a break from current projects and did some one day create and take drawings/projects.
Second, Third, and Fourth graders were given the challenge to take the basic Frankenstein and take it to the next level. I had the draw along you see below to help get them started and then they were left to their own devices! Inspiration for this came from here via Pinterest.
Kindergarten and First Grade took two classes on these, one to talk about texture and create the main pumpkin (using texture plates) and then finished up the next class with the string and leaves. Inspiration came from here via Pinterest.
When Kindergarten and First were finished with their pumpkins, we read the hilarious book Monsters Love Underpants and did a collaborative monster drawing on the SMART Board and then some quick monster drawing on their own.
Last but definitely not least I bought pumpkins for my small group of High School Adaptive Art students and we taped them off with masking tape and used acrylic paint to paint different sections. The paint peeled some but no complaints from that group :)
And a few bonus artworks...one class of Kindergarten and First did the the spiders on an early release day and the pumpkin man was a bonus drawing a 4th grader did with some extra time. Spider inspiration came from here via Pinterest.